

Overview
I built the Memory Box for my son's third birthday. It is a wooden keepsake box with a 7.5-inch red, black and white e-paper display set flush into the lid. Through the day it rotates through family photos, and a small fingerprint scanner next to the screen lets whoever touches it call up photos they are in. Inside the lid, a Raspberry Pi Zero W runs Raspberry Pi OS, a Python service, and a PostgreSQL database that holds every memory and who is tagged in it.
The project started as an ESP32 prototype, moved to the Pi when the tagging system outgrew a microcontroller, and ended with Fusion 360 models, 3D-printed enclosures, a battery that shuts the box down safely, and an iPhone app for uploading photos. I wrote a technical build log and made a video about it.

Display
A 7.5-inch red, black and white e-paper panel sits flush in the lid and holds a photo with no power at all.

Fingerprint
An optical sensor in a small metal collar. Touch it and the box finds the photos you are in.

Enclosure
Two 3D-printed brackets hang from the lid and keep the Pi, battery and drive where a three-year-old cannot reach.
The problem
I set out to build my son a heirloom he would use his whole life. The first idea was plain woodworking, which I quickly discovered I knew nothing about. The idea that stuck was a box that keeps memories in a literal sense: photos that change on their own, slowly, in a material that looks more like paper than a screen. The fingerprint scanner was for him. He had seen one at daycare and desperately wanted to use one.
That set three constraints that shaped everything else:
- It has to look like furniture, not a gadget. No glowing screen, no visible electronics, nothing that needs charging every night.
- It has to know who is touching it. A fingerprint should map to a person, and a person to the photos they appear in. That is a database problem, not a microcontroller problem.
- It has to survive a three-year-old. Everything fragile lives under the lid, and the box itself stays empty for the things he will put in it.
How it works
Upload. My wife and I add photos from an iPhone app I wrote. Each upload carries the photo, a description, a date, and the people in it. The app posts a multipart form straight to the box over Wi-Fi, so nothing goes through a server outside the house.
Store. A Python service on the Pi runs as a Linux service, so it comes back after every reboot. It writes the original to a USB SSD and the metadata to PostgreSQL. When a fingerprint matches, the box queries for photos tagged with that person and picks one.
Dither. E-paper has three colours and no greys, so every photo is resized to 800 × 480 and run through Floyd–Steinberg error diffusion against a red, black and white palette. The result is split into two one-bit planes, one for the black pixels and one for the red, which is exactly what the panel's driver expects.
Draw. The Pi talks to the panel over SPI through a Waveshare driver HAT. A full refresh flashes the panel black and white a few times before the new image settles. It takes around fifteen seconds and is slow and deliberate in a way I grew to like.
Power. A PiSugar 3 board and a 1200 mAh cell let the box run unplugged. It watches the battery, stops refreshing the screen when a shutdown is near, and powers off cleanly so the SSD and SD card never get corrupted. Two recessed buttons under the lid reboot the box or blank the panel for long-term storage.
Photo to paper
The thing most people notice first is how the pictures look. Here is the same conversion the box runs, live in your browser. Drag the divider, and try the other dither modes to see why I kept Floyd–Steinberg.
Each pixel's rounding error is pushed into its neighbours, so tone survives as grain. This is what the box ships.
- Black plane
- Black—
- Red plane
- Red—
800 × 480 · 3 colours · 2 planes × 48,000 bytes
Uploaded photo
800 × 480
One of the test images I used while writing the upload tool, resized to the panel's 800 × 480.
What the panel receives
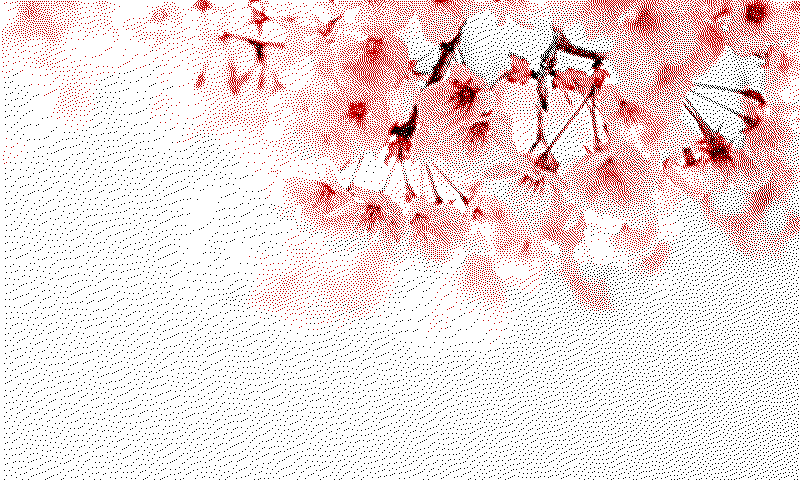
Floyd–Steinberg against a three-colour palette. The red plane carries the blossoms, the black plane the branches, and the sky is simply unpainted.
One of the test images I used while writing the upload tool, resized to the panel's 800 × 480.
800 × 480
Process
Prototype on a microcontroller, then change my mind. The first version ran on a Waveshare ESP32 e-paper driver board with an SD card reader, a real-time clock, and the fingerprint sensor on a breadboard. It worked, but the tagging system meant storing people, photos and the links between them, and doing that well on a microcontroller was a project in itself. Switching to a Raspberry Pi Zero W gave me Linux, PostgreSQL, SSH, and a Python service in an afternoon.

01 · ESP32 prototype
Driver board, DS3231 clock, SD card, fingerprint sensor. Fine for a photo frame, wrong for a database.

02 · Raspberry Pi Zero W
Raspberry Pi OS, PostgreSQL, a Python service, and a PiSugar 3 for power. The same job with far fewer compromises.
Model the box I could not build. I bought a finished wooden keepsake box and modelled it in Fusion 360 so I could design around it. Three mechanical questions drove the design: how to mount the display so it sits flush in the lid, how to hang the electronics under the lid, and how to keep all of it away from small hands.
 01
 02
 03
 04
 05
 06
- 01The bought box, modelled in Fusion 360 with the display cutout and scanner hole.
- 02The display sits in a printed tray that mounts to the underside of the lid; a frame covers the cut edge.
- 03Side view of the lid. The Pi, battery and drive live in one enclosure, the driver board in the other.
- 04The real thing. Yellow PLA enclosures under the lid, box empty for keepsakes.
- 05A test print to line up the two recessed button holes before committing to the whole lid.
- 06Two wires soldered to the PiSugar so the buttons could reach the enclosure wall.
Print, fit, glue. The frame, display tray and both enclosures were printed on an Ultimaker S3 in yellow Ultimaker PLA. The yellow was a practical choice that became the only accent in the whole design. Hot glue on every connector keeps the wiring in place when the box is carried, dropped or shaken, all of which have happened.
Write the software I was actually qualified to write. The iPhone app pulls from the Photos library, lets us describe a photo and tag the people in it, and uploads it to the box. The Python service on the Pi handles storage, dithering, scheduling, and the fingerprint lookup. I also soldered on a second button that runs a custom script, currently one that clears the panel, as the display manual recommends before long storage.
Parts
BOM · as built
Qty
Display
7.5″ e-paper panel
Flush-mounted in the lid.
1
800 × 480 · red / black / white
Waveshare e-Paper Driver HAT
Drives the panel from the Pi.
1
SPI
Compute and storage
Raspberry Pi Zero W
Runs the service and the database.
1
Raspberry Pi OS · Python · PostgreSQL
Portable SSD
Originals and the database.
1
250 GB
Prototyping board and breadboard HAT
Soldered connections for the buttons.
1
Power
PiSugar 3
Low-battery shutdown so the SSD and SD card survive.
1
1200 mAh
Sensing and input
Optical fingerprint sensor
Set into the lid beside the panel.
1
R503 · UART · 3.3 V
Recessed buttons
Power, and a script that clears the panel for storage.
2
Printed parts
Frame and enclosures
Yellow Ultimaker PLA.
set
PLA · Ultimaker S3
Box
Wooden keepsake box
Bought, not built. Brass hinges and latch.
1
Rosewood stain
Retired with the prototype
Waveshare ESP32 e-Paper driver board
First version; replaced by the Pi.
1
ESP32
Real-time clock
Needed on the ESP32, not on the Pi.
1
DS3231
10 parts in the box · no prices here
Links for every part are in the build write-up.
Outcomes
The box has been on a shelf in my son's room since his birthday and has displayed every photo we have uploaded since. It did what I wanted a gift to do: it is quiet, it looks like it belongs in a house, and he knows it is his because it answers to his finger.
A few things I would change:
- Back up the database and photos automatically, so the box can be reincarnated after a catastrophe.
- Revisit the microcontroller and design a small custom PCB.
Video
I made a video about the build, and a short Blender explainer of the idea before any parts arrived.
The full technical write-up, including the wiring, the dithering script and links for every part, is in How I Built the Memory Box.